Today, more people are using mobile devices to access the Internet than ever before. While technology and networks are getting better, not everyone has a good cell phone connection. We want our sites to still load quickly, and optimizing images is one the easiest things we can do to improve speed.
Getting started
- Open your image with Photoshop
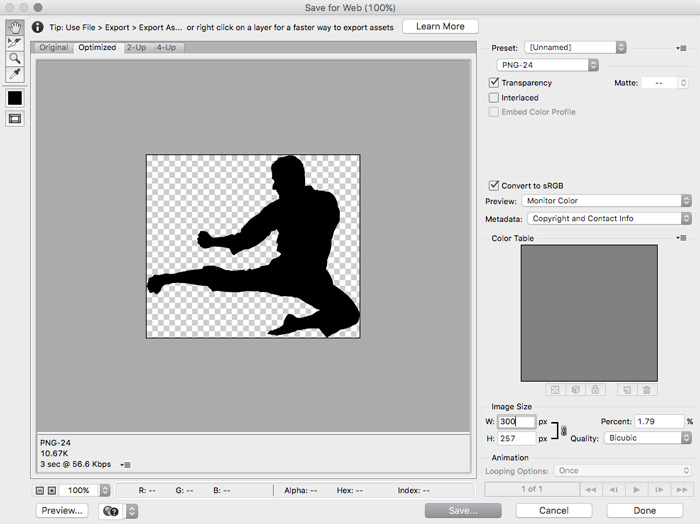
- Choose File -> Export -> Save for Web (Command + Option + Shift + S on Mac)
- A dialog window will show all kinds of nifty information. The most important area to pay attention to is the bottom left corner. Here you’ll find out how big the file size is, and how long it will take to download at certain connections.
- Using the options on the right side of the window, you can experiment with different settings to reduce the file size. Usually, as you change settings, an optimized preview will show. Study that optimized image and compare it to the one you started with, by clicking the Original tab. If you can reduce the file size without pixelating or blurring the image too much, you’ve done your job.
- Once you get the image down to a small enough size, save it, and add it to your site!
What type of image should I use and when?
- JPG or JPEG: Use this for images with a lot of detail, such as people and nature. Lowering the value in the Quality field will greatly reduce the file size.
- PNG-8 or PNG-24: Typically, these are used for transparency, allowing the image to show up over a background color or another image. Without getting too nerdy, a PNG 24 will give you a perfectly clean cut-out around the image, and a PNG-8 will add a “Matte” or colored border around the cutout (while remaining far smaller in size that a PNG-24). Use a PNG-8 when you have a solid background color behind the image. You can then set the matte as that background color and still enjoy a reduced file size.
- GIF: These allow transparency, like PNGs, but can be slightly smaller in size – depending on the content in the image. GIFs are great for charts and graphs, or anything with text and solid colors in it.
- WBMP: Monochromatic image format with smallest file size. This is not very useful in most applications.
What size should I save my image as?
- Your image should be 72 dpi.
- The dimensions size will depend on the area of the screen where you want the image to show. An easy way to measure your screen is to install an extension in your browser, such as Page Ruler.
- Screens with high resolutions, such as retina displays, sometimes need special optimization. I’m not going to get into any detail here, but I would consider using optimized images for these types of displays. Additionally, consider using vectors in the form of SVGs for images that can infinitely scale to any size, without losing quality.
Tips and tricks
- When using JPEGs, I always start with a quality of 51%. (There’s a noticeable drop-off in quality between 50 and 51%.) If the image still looks too jagged, increase it to 60, then 70, then 80, or until you’re happy with it.
- GIF and PNG-8 formats allow you to select how many colors you’d like saved in the image. This is very handy if you have a simple image with only a handful of colors in it, like a logo, a chart, or a monochromatic image. Selecting fewer colors will greatly decrease the file size.
- Image files can sometimes contain extra information that you don’t really need, adding to the file size. Photoshop doesn’t always remove this extra info. If file size is still an issue, you may want to try an image compression tool. There are many sites that will do this quite easily, including TinyJpg or Compressor.io. You can also download software for your desktop, like ImageOptim or FileOptimizer
- This trick is neat if you’re exporting an image of a person, but requires some additional knowledge in Photoshop. For portraits of people, you can generally get away with blurry details everywhere but the face. Start by duplicating the image and reducing the quality. Optimize it for web, then bring it into your original file as a new layer directly over your original. Mask out the area of the person’s face and the high-quality face from the layer below will show through. Save for Web again. Most viewers will never know the difference, and you’ve just reduced the file size dramatically!
Resources
If you don’t have Photoshop, you can use free software such as Gimp.